This post may contain affiliate links. I may receive commissions for purchases made through links in this post at no cost to you.
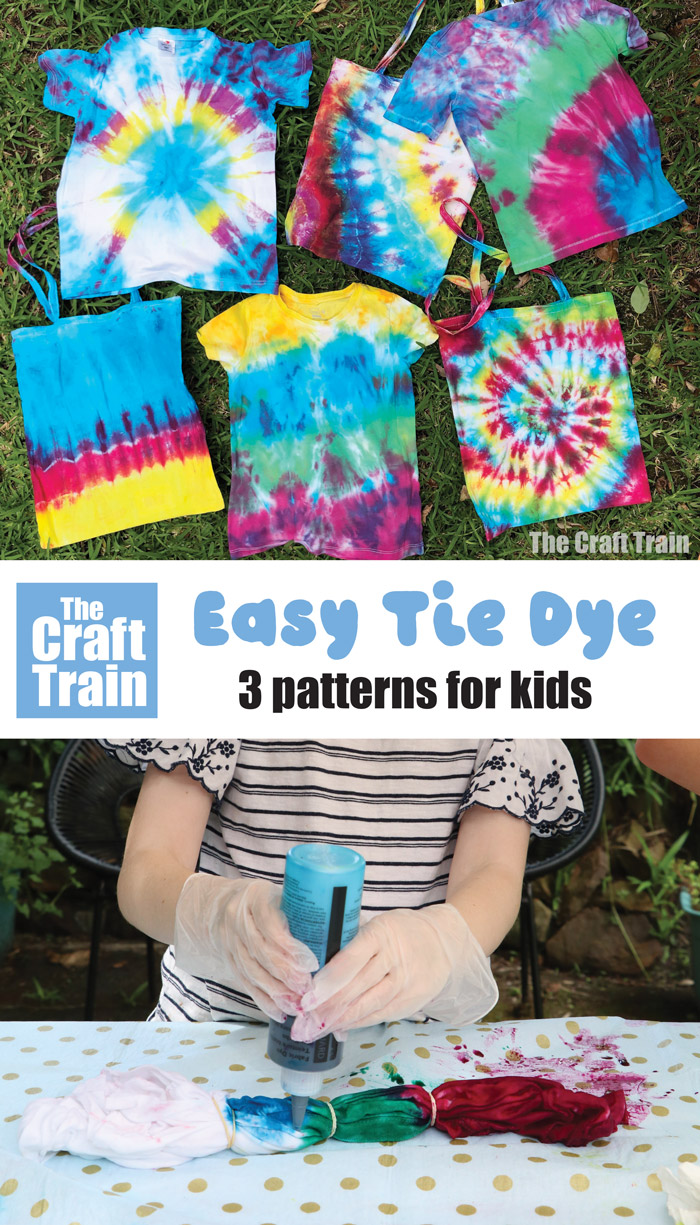
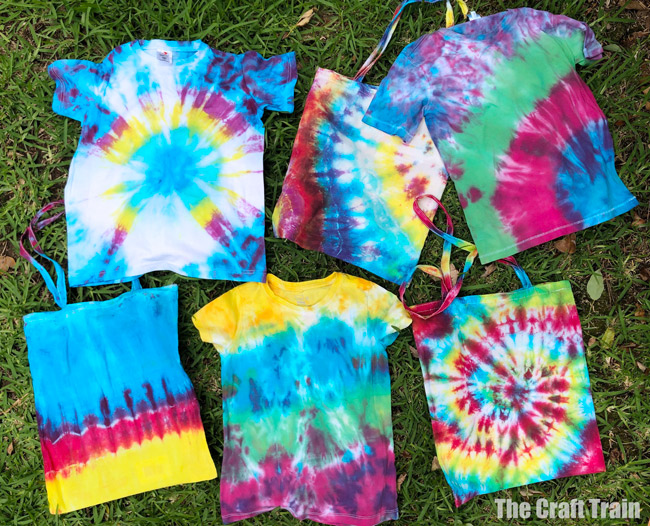
Here is a step-by-step rundown on three easy tie dye patterns you can do when tie dying with kids: the Swirl, the Sunburst and the Stripes.
Scroll to the end of the tutorial for a printable set of instructions to make this craft easier at home.
Have you tie dyed before? Tie dying is something that has been on my craft bucket list since forever. This Summer I finally ticked it off – and it was awesome fun!
Together with the help of the girls (and a few of their friends) we tried and tested a range of tie dying techniques, three of which we want to share with you today.
This craft was first published in 2019 and has been updated and reshared for today’s audience
You might also like our DIY solar oven

There are lots of different tie dye techniques and patterns out there but sometimes too much choice can be confusing for kids, which is why we’ve narrowed it down to our three favourites: the swirl, the sunburst (or bullseye) and the stripes.
These three easy patterns make a great starting point for beginners of all ages – young or old!
The good thing about tie dying is that although there are patterns to follow, there is no real right or wrong. The girls tried making some traditional patterns and they also wanted to experiment by making their own designs which had varying results. Remember that they’re not all going to come out perfect but that’s all part of the creative learning process, and the big reveal when you unravel your design is just SO much fun.
Before we begin there are a few basic tips that are worth taking on board:
Tie dye tips for beginners:
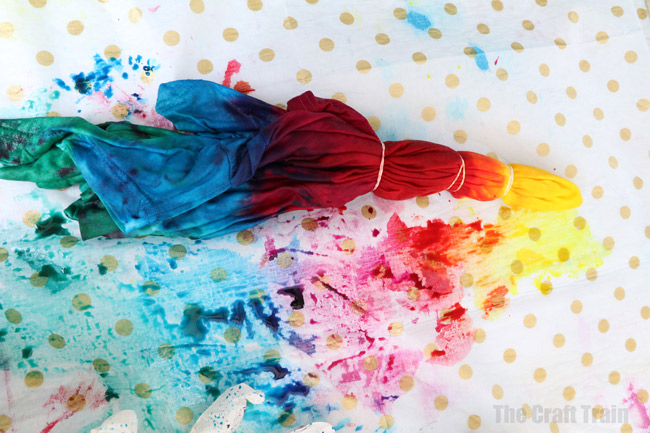
- Think about blending colours. When you put two colours next to each other they are going to overlap and blend to make a third colour. Eg: if you put yellow and blue together the overlapped section will look green, but if you put green next to purple, the overlapped section will be a muddy brown. This is a good chance for kids to put their colour theory into practice.
- Tye dye is messy. Make sure you’re not wearing your favourite outfit or you’ll get dye splatters on it for sure! Also cover the table surface with a plastic disposable tablecloth (it will get stained), and make sure you have enough rubber gloves for everybody who’s participating (most kits only come with one pair). Tie dye will stain skin but this fades away in a day or two so if you do get a few blotches on your hands it’s not the end of the world.
- Fabric needs to be 100% cotton. Polyester blends won’t take the dye as well. You can order plain white cotton t-shirts online or pick them up cheaply at Kmart (we did both
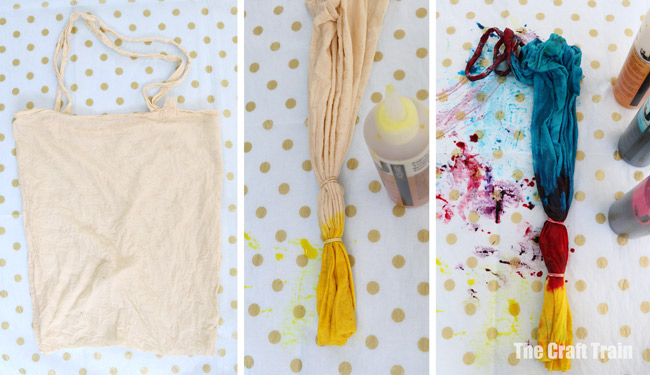
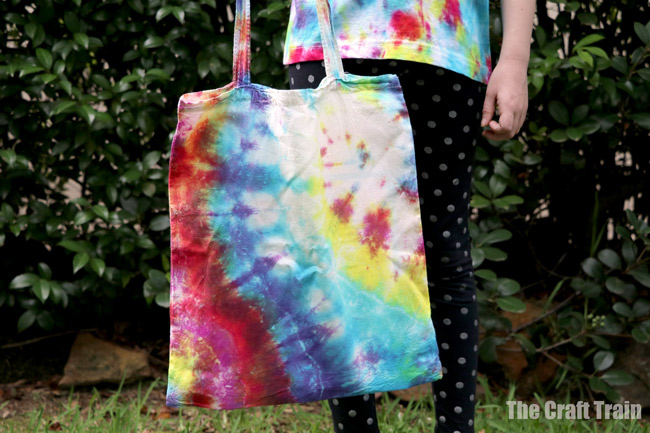
- Have more than one T-shirt each to dye. It’s so much fun that one is just not enough and there is bound to be enough dye left over to make another one. You don’t want to have to waste it do you? Also, you are not limited to t-shirts. Try dying pillow cases, tote bags, singlets etc. (just make sure they are 100% cotton)
- Pre-soak for a brighter result. Pre-soaking in washing soda will help the dye adhere to the material and will give brighter, longer-lasting results. Some kits come with a pre-soaker included and some don’t.
Each tie dye brand is a little different with different process instructions, so it’s a good idea to follow the manufacturers instructions for washing, pre-washing, drying etc. but I’m outlining a general process that we used for all of ours.
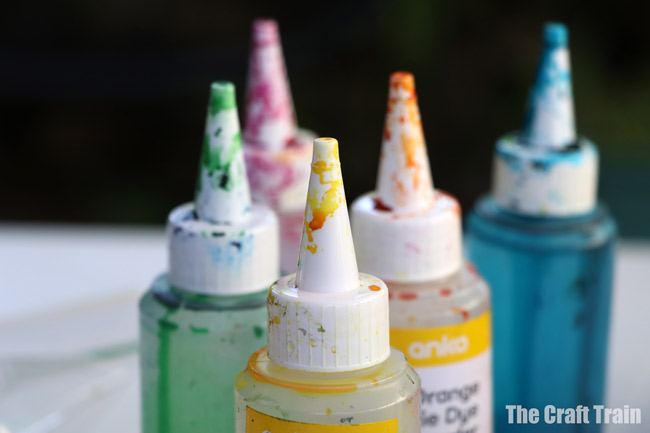
We experimented with 3 different brands including Jacquard (which one of the girls received as a Christmas gift – thanks Aunty Lisa), the popular Tulip brand and the budget Kmart one.
I’m a big believer in you get what you pay for when it comes to quality of craft materials, so I was surprised at how vivid and bright the Kmart dyes turned out (there was really no difference in finished product between that and the more expensive options and they are around a third of the price!).
You will need:
- A tie dye kit
- Washing soda for pre-soak
- Rubber bands
- Disposable or rubber gloves – enough for each person to have a pair
- White, 100% cotton t-shirts or tote bags (or whatever you want to dye!)
- Soaking bucket
- Plastic table cover, and if dying indoors use a drop sheet for the floor
- Large plastic zip lock bags or cling wrap
- Paper towel for cleanup
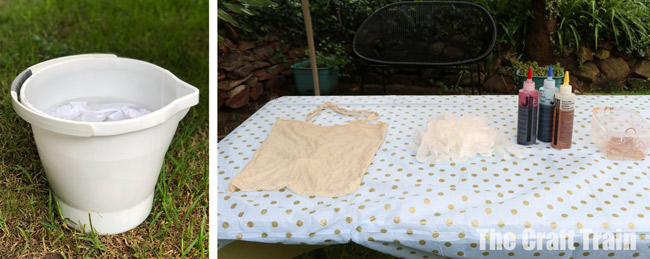
Setting up:
• For lower stress levels set this activity up outdoors – remember this is going to get messy! We put up a folding outdoor table and covered it with a disposable cloth.
• Mix half a cup of washing soda into a bucket of warm water and place your pre-washed items in there ready to go (you don’t need to dry them first). Put it next to the table so the kids can take the items out as they are ready to die them.
• Put the dyes, rubber bands and gloves in the centre of the table and you’re all set!
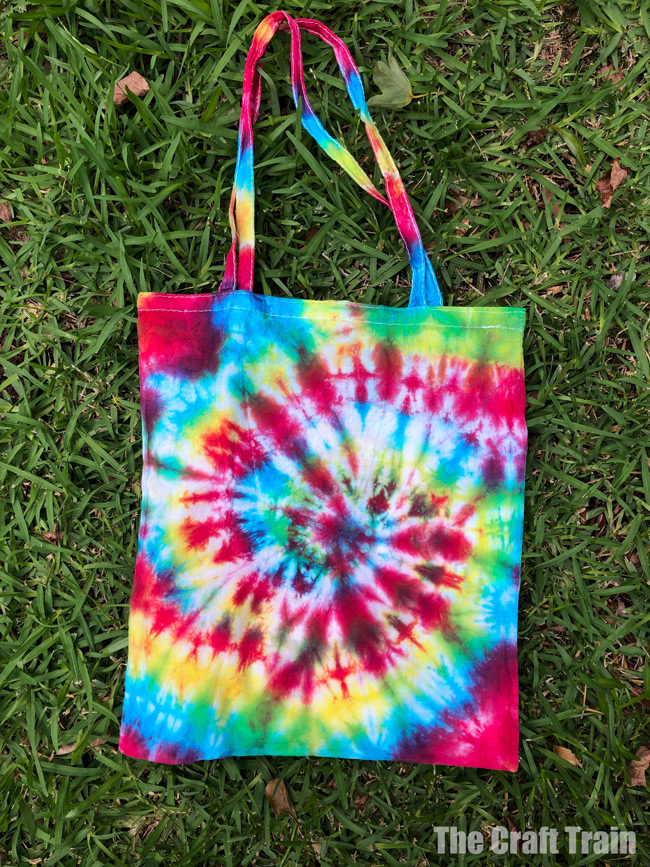
The Swirl tie dye technique
The swirl is such a classic, and it’s super easy to make too. We made swirl tote bags to use as library bags and the girls also made a swirl t-shirt each.
- Wring out the washing soda from your item (no need to rinse) and lay it out flat on the table.
- Take a pinch in the centre of your item (or where you want the centre of the swirl to be) and slowly twist it.
- Keep twisting until the entire item has been swirled into a compact, round shape.
- Place rubber bands around it to keep it in shape. We placed four rubber bands on, dividing the round shape up like a pie.
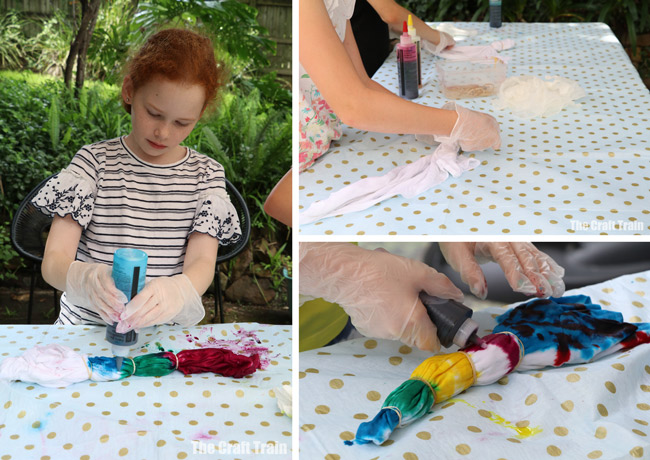
- Die wedges of colour coming out from the centre. It’s easiest to make each rubber banded section a different colour, but so long as the wedges are coming out from the centre it doesn’t really matter if you stick to the divided sections or not.
- Turn the item over and dye the back to match the front.
- Place in a ziplock plastic bag and write the person’s name on the front. Alternatively wrap in cling wrap.
- Leave for 24 hours for the dye to do it’s work.
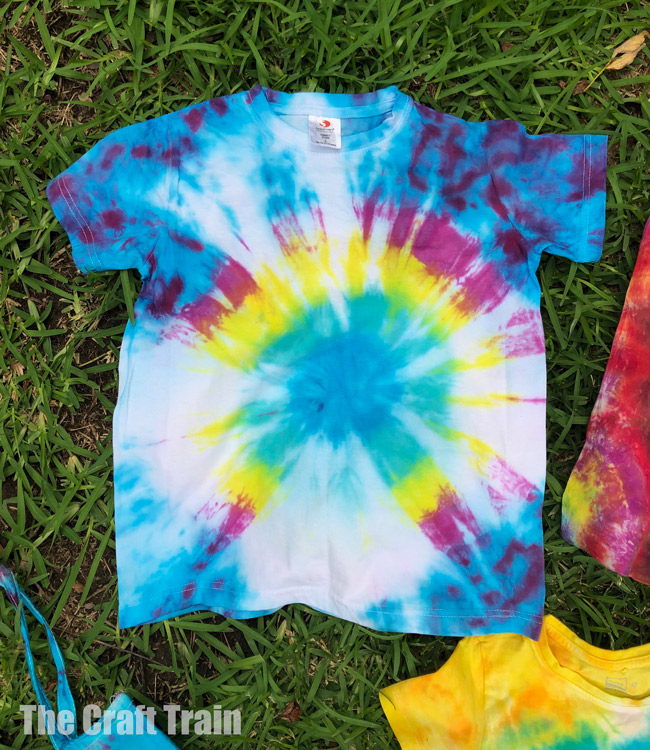
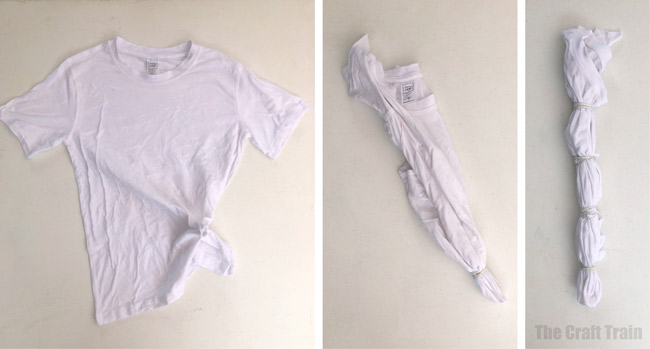
The sunburst tie dye technique
The sunburst is so called because it looks just like a sun radiating beams of light from the centre of your design. This is super easy to create and looks really effective when finished.
- Wring out the washing soda from your item (no need to rinse) and lay it out flat on the table.
- Take a pinch of fabric from your item and tie it with a rubber band. This will be the centre of your sunburst (it does not need to be in the centre of your shirt).
- Grab a bit more material into the pinch and tie another rubber band around it. Repeat until you have four or five rubber bands and your item resembles a snake shape with sections created by the rubber bands.
- Die each section a different colour, taking care to put colours that blend well next to each other. You can overlap the colour into different sections if you like – the creative part is up to you!
- Turn the item over and dye the back to match the front.
- Place in a ziplock plastic bag and write the person’s name on the front. Alternatively wrap in cling wrap.
- Leave for 24 hours for the dye to do it’s work.
Stripes tie dye technique
Stripes are super easy to make and can look great! As with the other designs, blending colours which work together next to each other can make a big difference to your overall design.

- Wring out the washing soda from your item (no need to rinse) and lay it out flat on the table
- Fold your item concertina style with lots of small folds as though you are making a paper fan. You should be left with one long strip
- Tie a rubber band where you would like each stripe to be
- Dye each section a different colour, blending them if you like
- Turn the item over and dye the back to match the front
- Place in a ziplock plastic bag and write the person’s name on the front. Alternatively wrap in cling wrap.
- Leave for 24 hours for the dye to do it’s work.
Rinsing and washing your tie dye
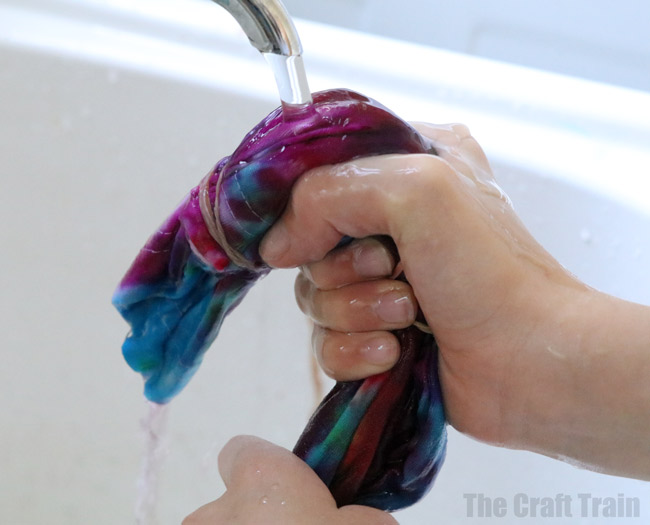
- Once the 24 hour wait is up, rinse the dye out in warm water, gently pressing and squeezing the excess dye out. Leave the rubber bands in place whilst you are rinsing.
- Turn the water up to a hot temperature and rinse a bit more. The heat will help to set the dye.
- Once the water is running mostly clear, squeeze the excess water from the item.
- Snip the rubber bands with scissors, being careful not to accidentally cut a hole in your fabric.
- Line dry, then place all tie dye items together (without adding any other laundry) in the wash on a normal cycle.
- Line dry or tumble dry on a warm cycle.

You now have gorgeous, colourful tie dies to show off – well done!
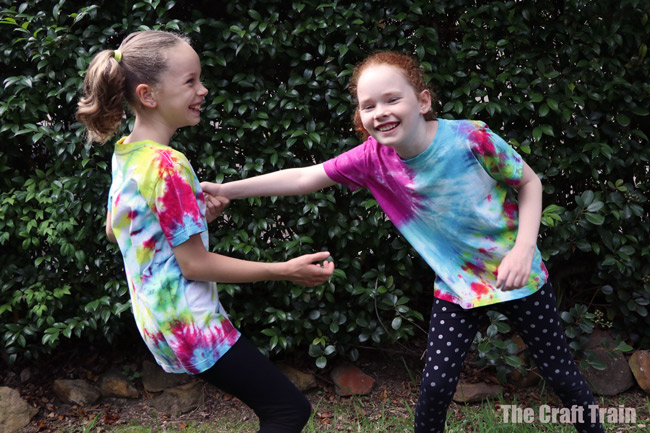
The girls had LOTS of fun making their tie dyes. They both thought of things they would like to try differently next time so tie-dying is definitely something we’ll be doing again next Summer!
Yield: 3 different patterns
Create thee simple tie dye patterns: the Swirl, the Sunburst and Stripes
Prep Time
1 hour
Active Time
30 minutes
Additional Time
1 day
Total Time
1 day 1 hour 30 minutes
Difficulty
easy
Materials
- A tie dye kit
- Washing soda for pre-soak
- Rubber bands
- Disposable or rubber gloves – enough for each person to have a pair
- White, 100% cotton t-shirts or tote bags (or whatever you want to dye!)
- Soaking bucket
- Plastic table cover, and if dying indoors use a drop sheet for the floor
- Large plastic zip lock bags or cling wrap
- Paper towel for cleanup
Instructions
Setting Up
- Cover your table with a plastic tablecloth and the floor with a drop sheet if working indoors.
- Mix half a cup of washing soda into a bucket of warm water and place your pre-washed items in there ready to go (you don’t need to dry them first).
- Put it next to the table so the kids can take the items out as they are ready to die them.
- Put the dyes, rubber bands and gloves in the centre of the table and you’re all set!
Swirl Pattern
- Wring out the excess water from your item and lay it flat on the table
- Take a pinch in the centre of your item (or where you want the centre of the swirl to be) and slowly twist it.
- Keep twisting until the entire item has been swirled into a compact, round shape.
- Place rubber bands around it to keep it in shape. We placed four rubber bands on, dividing the round shape up like a pie.
- Place a different colour dye into each section created by the rubber bands
- Turn the item over and dye the back to match the front.
Sunburst pattern
- Wring out the excess water from your item and lay it flat in the table
- Take a pinch of fabric from your item and tie it with a rubber band. This will be the centre of your sunburst (it does not need to be in the centre of your shirt).
- Grab a bit more material into the pinch and tie another rubber band around it. Repeat until you have four or five rubber bands and your item resembles a snake shape with sections created by the rubber bands.
- Die each section a different colour, taking care to put colours that blend well next to each other. You can overlap the colour into different sections to create blends if you like – the creative part is up to you!
- Turn the item over and dye the back to match the front.
Stripes Pattern
- Wring out the excess water and lay it out flat on the table
- Fold your item concertina style with lots of small folds as though you are making a paper fan. You should be left with one long strip
- Tie a rubber band where you would like each stripe to be
- Dye each section a different colour, blending them if you like
- Turn the item over and dye the back to match the front
The dying process
- Place in a ziplock plastic bag and write the person’s name on the front. Alternatively wrap in cling wrap.
- Leave for 24 hours for the dye to do its work.
Rinsing and washing
- Once the 24 hour wait is up, rinse the dye out in warm water, gently pressing and squeezing the excess dye out. Leave the rubber bands in place whilst you are rinsing.
- Turn the water up to a hot temperature and rinse a bit more. The heat will help to set the dye.
- Once the water is running mostly clear, squeeze the excess water from the item.
- Snip the rubber bands with scissors, being careful not to accidentally cut a hole in your fabric.
- Line dry, then place all tie dye items together (without adding any other laundry) in the wash on a normal cycle.
- Line dry or tumble dry on a warm cycle.
Notes
These are general tie dying guidelines. All dye brands are a bit different so it’s important to read the manufacturer’s instructions on the pack too.
More traditional crafts you can do with kids: